Carla's At-Home Facial Technique For Beautiful Makeup!
- Apr 9, 2020
- 4 min read
Updated: Apr 30, 2021
Hi beauties!! I'm back with another skincare tip. This one is a fantastic one! This routine will work on any skin type! I am using one of my favorite skin preparation product lines! I love to prepare the skin for makeup with the Sonia Roselli Beauty Skin Prep line! This skincare line is the perfect preparation for makeup! This line creates smooth, soft, glowing skin. Today I will use some of my favorite products from the line for my at-home facial.

I am all for trying an at-home facial. In fact, I do them weekly! So let's get into it!
Step 1: Exfoliate

I am using Sonia Roselli Beauty's Sex-A-Peel Exfoliator. This exfoliator is a citrus-based product that sloughs away dead skin. I like to spray a few spritzes into my hand and start exfoliating. The best way to remove all dead skin is to apply this product with your fingers and move in circular motions. You'll know it's working when you see little balls of dead skin all over your face! (I know it sounds a little gross, but that means you're successful!)

As you can see, I had a lot of dead skin sitting on my face! Pretty gross, but now it's gone! SRB has a lovely oil-based cleanser, but I preferred to use my daily cleanser instead.

Step 2: Cleanse
Normally this would be step 1, but when using SRB Sex-A-Peel, cleanse jumps to step 2. The reason for this is because you want to make sure you are removing as much of the dead skin on your face as possible. As you can see in the above photo, my skin is clean and completely free of dead skin.
I recommend using SRB Japanese Cleansing Oil if you are dry and looking for more hydration. If you are oily, stick to your everyday cleanser.
Step 3: Mask
This is my fave part beauties! I love masking! I use clay masks in my facials to help absorb any leftover gunk and junk in my pores. I'm a normal-to-oily skin type, so kaolin clay masks are perfect for my skin! My favorite clay mask is the Laneige Mini Pore WaterClay Mask. According to the jar, I leave the mask on for 10 minutes (or until fully dried). Then I remove it with the sponge that came with it! I wet the sponge with warm water and press the wet sponge onto the dried mask to make it easier to remove. Then I use the sponge to remove the entire mask.
If you are not an oily skin type, I recommend only using a clay mask once per month. This way you can maintain clean skin!

Step 4: Rinse**
This step is only relevant if you use a clay mask. If you do not use a clay mask, skip this step!
The reason for rinsing after a clay mask is to ensure that all of the mask is removed. First I rinse with warm water, then I rinse with very cold water to close the pores.
Step 5: Serum
Serums are great because they aid your creams and moisturizers in hydration. I am using SRB Water Elixir. Give it a good shake before using. I used two pumps of water elixir for my entire face-neck area. A little goes a long way with this serum. It is a thick serum, so your skin will feel soft and supple after application.

Step 6: Facial Oil
Facial oils are great for any skin type. They provide hydration without making your skin feel sticky and heavy. If you have dry skin, this will be the ultimate hydration. If you are oily, you will get hydration, while having control over your skin's oil production. You want to use SRB Water Oil shaken, not stirred. (I hope you all understood my joke!) That's right, you want to give Water Oil a very good shake, so all of the emollients mix well. This will make sure the product works correctly. This is a lightweight oil.
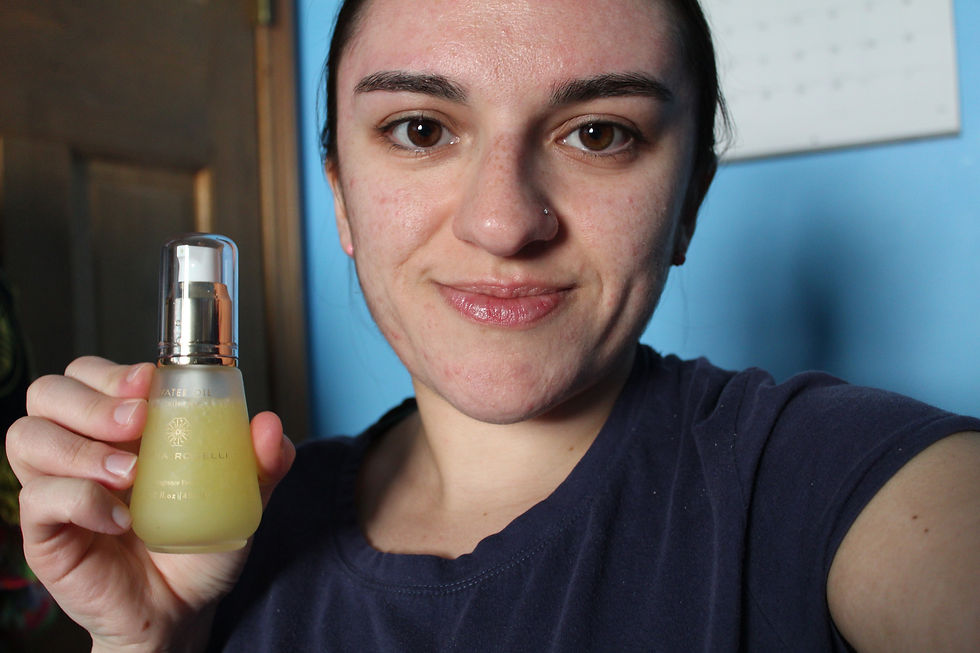
If you are oily, 1-2 pumps are enough. You will get the hydration you need, without feeling sticky and slick. If you are dry, 2-3 pumps will suffice. Your skin needs all of the hydration it can get, so don't be afraid to reap the benefits of this product.
Step 7: Moisturize
For today's facial, I am finishing off with SRB Water Balm moisturizer. This moisturizer is a light, citrus-based cream. It is the perfect lightweight cream for your daily makeup look.

I also really love Vichy's 89 Mineral. This product is more like a serum, but hydrates your skin like a moisturizer! I use it day and night and my skin loves it!
So that's it beauties. This was my at-home facial! My skin is feeling happy and healthy. It's clean, soft, and supple. I always try my hardest to do an at-home facial once per week. This works well for my skin because I wear a full face of makeup regularly and have oily, acne-prone skin.
While at-home facials are fun, I recommend them twice per month versus weekly. If you are having professional facials, I recommend skipping them altogether. However you can break apart the steps of my at-home facial and use them weekly! I recommend using the hydrating parts weekly to have soft, supple skin! If you are oily like me, I recommend using the clay mask weekly!
And now you're thinking: I have my at-home facial all done and my skin is soft and glowing. So what's next?

The next step is to create gorgeous makeup! I will teach you how to apply the perfect makeup look every time! Learn how to apply your makeup from the comforts of home. I am here to help you look great every day!
<3 Carla